Thursday, June 20, 2013

Ratatouille: Slow cooker style

Guys! Guys!!! I made Ratatouille!!!!! Seriously - major accomplishment on my part. I now get to cross something off my bucket list.


After seeing Disney's movie "Ratatouille" in which it portrayed a lovable mouse helping a goofy kid live up to his potential, find love and acceptance...yada yada yada.... I  always wondered what this magical dish was all about. Why could some potentially soggy veggies turn a grouchy old man into a lovable hero who defends his arch nemesis? Here is what I found -  Ratatouille is a provincial french dish. As I understand it, it's a type of French comfort food. While the movie portrays this to some extent, I never fully understood why it was a comfort food until last night when I made this for dinner.


While I deviated from the more traditional recipes, what I came up with was delicious. It's one of those cooking magic tricks where the sum of the whole is greater than the individual ingredients. I never would have thought these vegetables plus some pasta sauce would equal anything edible, but I stand corrected.

So, my excitement in making this dish was two fold. One - I crossed off an item on my bucket list. And two - it turned out fantastic!! If you make it, please share your results in the comments, even if you think it's gross! I love feedback :)


Ingredients:
1 Sweet potato, peeled
1 yellow summer squash
1 green zucchini
1 Italian Eggplant
1/2 medium onion, diced

~1 teaspoon Herbs de Province
Olive Oil
Salt/Pepper

Tomato sauce (I used pasta sauce from a jar, feel free to use your favorite or make your own)

Directions:
Wash and slice all veggies (except the onion) into 1/4" rounds. Half the sweet potatoes rounds (yes, you'll have a bunch of half circles). Cover the bottom of your slow cooker with the diced onions, then layer in the veggies, alternating between each one until all are used. You can do a second layer if you'd like!

Cook on low 3-4 hours until veggies are tender. Serve over your favorite pasta sauce and sit down to watch Disney's Ratatouille. 

Layered veggies
Spread the sauce


Add the cooked veggies (I used a slotted spatula, fyi) for a finished product! 


Short Hand: In the slow cooker, layer sliced veggies on top of diced onions. Drizzle with olive oil, sprinkle with herbs de province, salt, and pepper. Cook on low for 3-4 hours until veggies are tender. Serve over pasta sauce.

Wednesday, June 19, 2013

Salsa y Guacamole

Por los personas que no saben, yo servir una mision en sur de California, donde que yo aprende Espanol. (For the people who do not know, I served a mission in Southern California, where I learned Spanish.) Also, I lived in Tucson, Arizona until I was 13 years old. As a result of both, I have a cultivated taste for authentic mexican food cooked by loving mothers, caring sisters, and daring fathers who braved many a hot grills. Really, most mexican food is about love. And if you haven't guessed it yet, I love food.


This version of salsa and guacamole came into existence in my kitchen because I had left over avocado slices from Sushi night (pictures coming soon), thanks to Ms. Megan who brought them. As I thought back to how my mom made guacamole  I remembered that she made salsa, left a little in the food processor, and then added rich green avocado's and her magical 'mom love'.


Also, I've been wondering how well avocado's and guacamole will freeze - thus this is part "I can't just throw these avocado's away!" and part "Hmmm... let's see if this works." If it does, Megan will get getting some homemade guacamole (fresh) from me in the future as a thanks for providing me the supplies to experiment.

Experiment: how well does guacamole freeze?
Hypothesis: Mediocre
Variables: Guac in freezer verses my memory of the guac I'm eating now.
Results: TBD


 Salsa Ingredients: 
2 Large Beefsteak tomatoes OR 4 medium Roma tomatoes, quartered
1/2 medium onion, cut into chunks
~1/3 cup fresh Cilantro
2 cloves garlic (or 1 teaspoon garlic salt)
1/2 teaspoon Cumin
1/2 - 1 teaspoon Sriracha Sauce*
Juice from one lemon/lime (I used lime)
2 Tablespoons red wine vinegar

S/P to taste

*start slow and ramp up your spice. Start with 1/4 teaspoon for the timid mouth - go crazy if you love pain. Also - you can use 1/2 to 1 whole Jalapeño. I don't like fussing with them needlessly, so I use Sriracha from the bottle.

Directions:
Pulse onion and garlic in food processor (or blender) for 10-15 pulses, or until onion is well diced. Add remaining ingredients and blend/pulse until salsa reaches desired consistency. Taste - add salt, pepper, or more spice to taste.


Now it's time for your guacamole....


 Ingredients/Directions: 
1/2 cup salsa (as above)
2 large avocado's, seeded, peeled

Add avocado's and salsa to the blender. Turn on low or pulse until desired consistency is reached. Pull out the chips, grab some chairs, your favorite drink, and head out to the porch to swapp stories of last summer while eating this super easy, ultra tasty, incredible salsa and guacamole. 


The wonderful thing about these recipes (and really most everything on this site) is that it's not an exact science. These, like many other recipes can be used a platform for your own ideas, modifications, or alterations. So add some flare and toss in something crazy and try it out. The good thing about trying out different foods is that you never need to repeat it if you hate it - and you'll never know if you hate something until you try it!

Tuesday, June 18, 2013

Savory Acorn Squash Soup


Enter the immersion blender. I received one as a wedding gift and have been oh-so-glad that I did. This little All-Clad beauty has been wonderful for me. I've been able to make salsa's, sauces, soups, puree's, and instand hot chocolate with it. You could use it for smoothies, milk shakes, etc, but I have a Magic Bullet for those.

Anyway.... I was grocery shopping this week browsing the produce section after I procured everything on my list and my eyes fell upon their squash cart. The acorn squashes seemed to fling themselves at me saying "Eat me! Eat me! Pick me!!!! I want to go home with you!" So I made my impulse by for the day (I allow myself one per shopping trip) and went on my merry way. Yes, I impulse bought a vegetable.

I thought about what I could do with it, and was vaguely dreaming of a gorgeously grilled or baked whole squash with sweet whipped cream and rich maple syrup.... THEN reality slapped me in the face and reminded me that I HATE the starchy, stringy, slightly gritty taste that squashes, gourds, or pumpkins can get when cooked, but not mashed or purred.  So, I quickly dismissed my notion of eating it whole and decided to turn it into a soup. My immersion blender plus the slow cooker made this super quick and fairly easy. I got home from work and was eating fresh, homemade soup less than 15 minutes later.

This soup is savory, rich, and very satisfying. It's thick and smooth, but is a great base if you wanted thin it down and add a slew of meats and veggies. It's also pretty easy, with basic ingredients. I like it in the summer because I cook my squash in the slow cooker rather than heat up my oven. This also allows me to purred it directly in the slow cooker and keep it warm if needed.

 For now though, I give you my most recent masterpiece: Savory Acorn Squash Soup


Ingredients:
1 acorn squash
1 cup chicken broth
2 cloves garlic

1/2 cup milk
1/4 cup cream
salt to taste

Optional:
Cheese
Parsley
Bacon

Directions:

Place chicken broth and garlic in slow cooker. Cut top off squash, deseed, and place in slow cooker. Cook on low for 4-5 hours or until all flesh is soft (test my inserting fork - there should be no resistance).

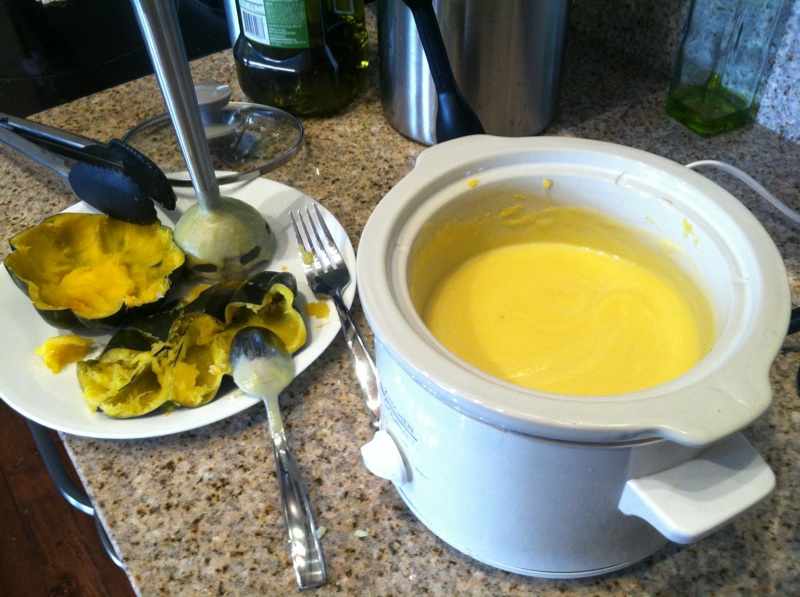
Remove squash onto place, scrape out all the flesh (THIS IS HOT!!! Use tongs, forks, spoons, whatever - but not your fingers!) and place it back in the slow cooker. Add milk and blend until totally smooth using soft up and down movements.
The dishes you see were the only ones I used. For me, this is an impressively limited amount of
 clean up - the slow cooker, plate, and a few utensils. It's really half the reason I love this soup. 

Add cream and salt, and mix just until blended (you don't want to whip it). Taste, salt as needed.

Serve with grated cheese, bacon bits, parsley, or pepper.


Shown with parsley, Jarlsberg, Cheddar, and Swiss Cheese


Serves 2-4 (Two for a main dish, 4 for sampler/starter sizes)

p.s. not all squashes are created equal. If you use a different squash/gourd, this will taste different. Feel free to swap out different squashes, or use a combination, but be warned!

Friday, June 14, 2013

Music From Heaven to a Deaf Man

I threw myself into cooking this week. I had avoided baking as I was trying to eat veggies, lean meats, and legumes mostly - but after a midweek 'meltdown' I spent two hours at the grocery store, basking in the glorious variety of foods that contain sugar, carbs, and starches. I toted home makings for sushi for a 'how to' night I'm hosting tonight, and a whole list of foods I had been itching to try or play with. Gnocchi with gorgonzola cream sauce, broccoli with pan seared steak, cherry almond scones with spiced cream tea, triple chocolate brownies, panna cotta with chocolate ganache, pumpkin soup, and Thai inspired spicy chicken soup with lime were just a few things that budded forth in my creative wake this week. 

For whatever reason cooking really helps me sort through stress. Perhaps it’s the act of creating something, enjoying good food, and feeling the sense of accomplishment when viewing a clean kitchen. Either way, it was music from heaven to a deaf man, paints from God to da Vinci, and literally, food for my soul from the earth.

Also, I've decided to add a new section of my blog - Reviews. I've been thinking about it for a while now and it's time I bit the bullet and did it. I love food, I love talking about, and I love just about everything about it. So keep your eyes posted from some up and coming food reviews!

Monday, June 3, 2013

Anytime Steak

Although it's getting to be summer time, we've enjoyed this simple and delicious meal year round. Steaks are traditionally grilled, but thanks for the man I love and a good cookbook, we've perfected the stovetop searing method.


This was inspired by my private cooking teacher, Tim Ferris, via his book "The Four Hour Chef". If you don't own it, and you love food and want to become a ninja in the kitchen, I suggest you buy it. And oh - how I wish he'd pay me to say that. Sadly, I think the self proclaimed rich playboy-ish, PeterPan-esque boy realizes he doesn't have to - his books sells itself. Why? Because they're all amazing.


Like good books, good steaks tends to sell themselves. While there are processes to tenderize less than amazing cuts of beef, I've decided I would rather just bite the bullet and drop a little extra money on a good cut. In this, I used a beef tenderloin (yes, expensive) cut from Sam's Club. I have yet to find a decent place that sells grass-fed that tastes remotely worth the small fortune I'd have to pay for it. Sam's club thus became the winner.


This is better than most steaks I've had in restaurants - and since being married to a Carnivore for the past year, I've tried a lot of different steak places. If this is your first time making steak at home, especially if you're nervous about pan frying it, BUY THE EXPENSIVE STUFF! Don't skimp and get something tough that you'll end up not liking because it will turn you off of cooking steaks at home in the future. I have found it's far less expensive to buy steaks at the store, and cook them at home than it is to go out to eat. Do the math, weigh your choices, and draw a line. As Tim would say - if it's gross or your screw it up, toss it out and count it as an inexpensive cooking lesson.


Ingredients:

1-2 Steaks (beef tenderloin) 1.5"-2" thick

1 clove garlic
3-4 springs rosemary or thyme (pick your favorite)
1 T Olive Oil or Ghee/Clarified Butter*
Salt and Pepper

*What I used.

Directions:

Heat a cast iron or nonstick skillet to high - I mean HOT! ***ALSO*** turn your oven on to 400º and get a baking dish/cookie sheet out and lined.

Pat steak dry, slice garlic cloves in half, and rub steaks with the cut side of the clove. Salt and peper as desired.


Add olive oil or Ghee to the pan, swirl to coat evenly, and gently place steaks into pan and scream and flail arms as the smoke fills the room. Ideally - turn the exhaust on before this - there is no way to avoid the smoke, but mmmmmmm it's so worth it. Sear those suckers well!

Sear both sides of the steak for two minutes, and using tongs, sear the edges too. Place steaks on the cookie sheet.


Place rosemary/thyme in the pan, push around a bit, then put them on top of the steaks.

Place the cookie sheet in the oven for 10-20 minutes depending on how well done you'd like your steaks. Mine were in about 10 because I like medium rare, as pictured. If you like them different, refer to this chart and use a meat thermometer to check them.

Presto - amazing steak. Top with some Ghee for an extra pop of flavor, and salt and pepper to your hearts content. Served here with Garlic Roasted Cauliflower (coming soon).


Wednesday, May 22, 2013

Roasted Red Pepper and Goat Cheese on Ciabatta


As spring comes around the corner, this is something I find myself siding towards. It's best served cold, and no one enjoys cold fingers in the winter. But, ahhhh, in the spring, when you can finally get outside and enjoy lunch at the park or with your window open, this is a winner. It's fresh, very satisfying, and messy as all get out. Make sure you have napkins and don't care what you look like while you're eating. If you do care, eat alone or learn to glory in the goodness of well made food. I pick the later and try to do it with class.

Ingredients:

4 Ciabatta rolls, halved
8 oz goat cheese, at room temp
8-12 basil leaves

1 Jar of roasted red peppers, or 2 whole roasted red peppers
1/3 c balsamic vinegar
1/4 c olive oil
2 tablespoons capers, plus 1 tablespoon juice
2 cloves minced garlic
Salt
Pepper

Directions:
Drain canned peppers and place back in jar, or place roasted peppers in a shallow bowl. Mix balsamic vinegar, oil, capers, garlic, and salt/pepper and pour over peppers. For best results, marinate over night. For those who are craving this a little more immediately, spoon some sauce onto the bread to get the flavor effect.

Toast bread, layer on cheese, peppers, and top with basil leave.


Short hand: Marinate peppers, layer goat cheese, peppers and basil on toasted ciabatta bread. Eat like the Gods. 


Sunday, May 5, 2013

Spinach Artichoke Dip


Let's be real. There are a thousand different versions of spinach artichoke dips floating around out there. I won't start making outrageous claims about how "this is the best!!!! thing!!!! ever!!!!!" like some people do about their variation of it. Because lets face it - it's not. There are a lot of things in life that are waaaaay better. In fact, there's even better food out there. Shocker, right?

Regardless of how snarky I can be, this basic recipe scratched an itch I'd been having for something salty and crunchy.

When it comes down to it, it's a bunch of mashed up artichoke hearts (ah, the real reason I was labeled a heartbreaker my whole life!), a handful or two of spinach, a few spoons of mayo, shredded asiago cheese, and some garlic salt. Pepper if you're adventurous. Heck, you can even measure the ingredients if you're going Downton Abby Formal on my. So, like I said, there is nothing special about this, other than the fact that when you eat it hot, on a crunch chip, your mouth starts craving more and before you realize what you've done, the whole thing is gone.


Ingredients:
1 can artchoke hearts, drained and mashed
1/2 cup mayo
1/2 cup shredded asiago, parmesan, OR swiss cheese
1/2 cup frozen chopped spinach, thawed
1 teaspoon garlic salt

***For anyone who is following a slow card or 'four hour body' diet, omit the cheese. If you want to add protein, mix in a few spoonfuls of black beans.

Direction:
Mix everything together in a medium bowl, and transfer to a microwave or oven safe serving blow. Microwave for 2 minutes, stir. Return for an additional 2 minutes, stir again, and return for 1 minute. Yes, it's in there for five minutes. If not hot, keep heating in 1 minute intervals.


If for whatever reason you don't have or don't want to use your microwave, bake in a 350º oven for about 30 minutes.


I don't use seasoned hearts, FYI. 

I only use olive oil mayo - yes mayo is 4HB certified. 

Ahhh, the cheese. 

Eat your heart out! Get it?! Hearts?!? hahaha! 


Either way you cook it, you're going to have one hot, easy, and delicious dish waiting for tortilla chips to hurry it to your salivating mouth. Enjoy!

Short Hand: Mix everything. Nuke it for 5 minutes, stirring every few minutes. Eat with chips.